What is Special Event Station mode?
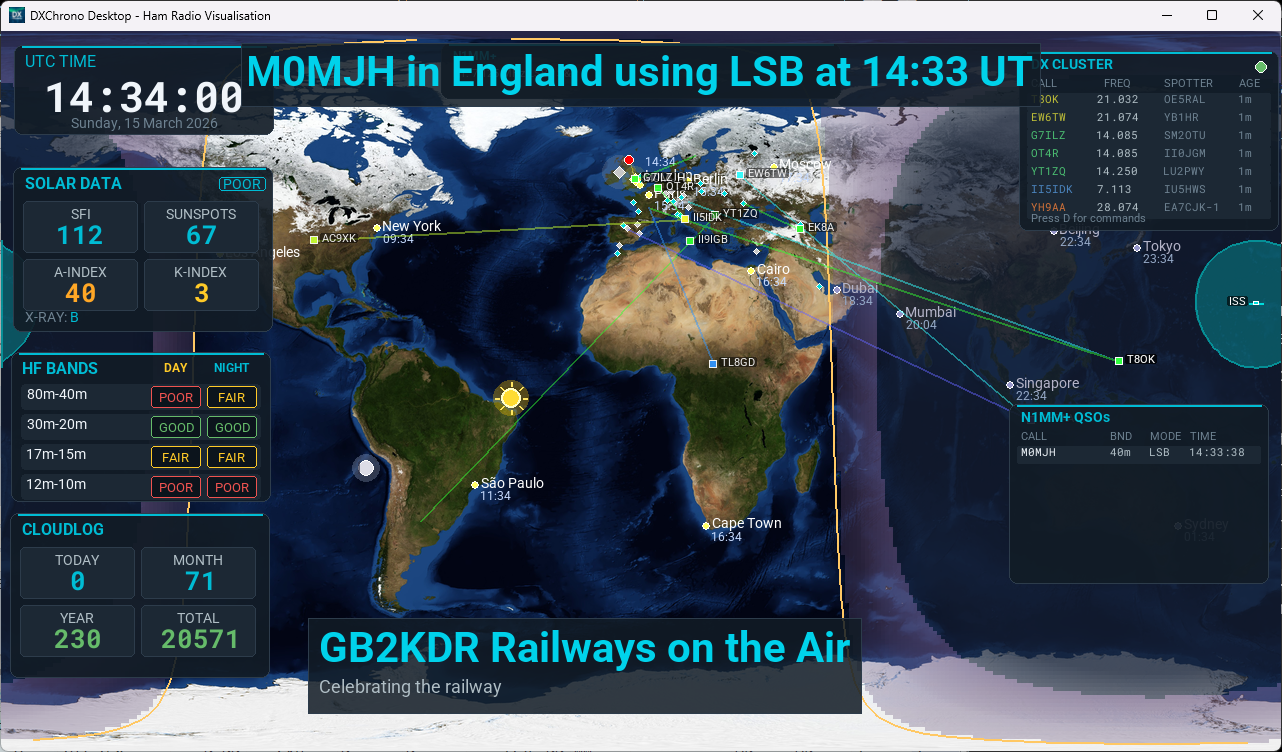
Special Event mode turns DXChrono into a public-friendly display for event stations, club open days, field days, or visitor centres. One large screen shows the world map, propagation, and who you just worked – so visitors and the public can see live contacts from around the world.
On-screen display
When Special Event mode is enabled you get:
- Scrolling “Last worked” banner – e.g. “Last worked: G4ABC in England using FT8 at 14:32 UTC” (marquee across the top or bottom).
- Event branding – Event name, dates, and optional tagline (e.g. “XYZ Special Event · 1–2 March 2026”).
- Contacts today – Count of QSOs today (when using Cloudlog as data source).
- Distance – Optional “About X miles” to the last worked station.
- Map legend – Short on-screen legend for lines and markers.
- Map – Today’s QSOs on the map with lines to your QTH; the latest QSO has a larger, pulsing marker.
Data source: Cloudlog or N1MM+
You choose where the last-worked and map QSO data comes from:
- Cloudlog – Use your Cloudlog logbook. Configure Cloudlog in Settings → Cloudlog and set Last Worked / Banner Data From → Cloudlog.
- N1MM+ – Use N1MM Logger+ over UDP. Enable N1MM in Settings → N1MM and set Last Worked / Banner Data From → N1MM+. No Cloudlog needed; country names come from the built-in cty.dat lookup.
Settings
Open Settings (S) → Special Event tab to enable the mode and set options:
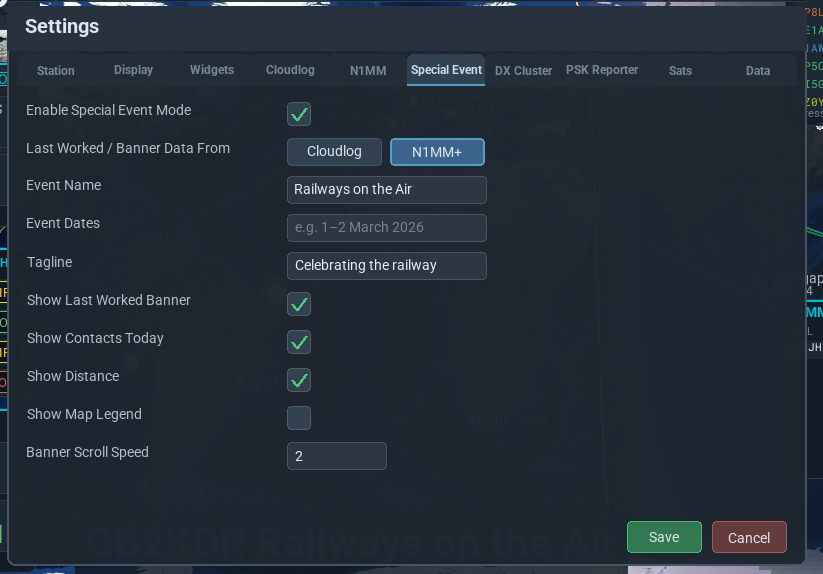
- Enable Special Event Mode – Turn the mode on.
- Last Worked / Banner Data From – Cloudlog or N1MM+.
- Event Name – e.g. “XYZ Special Event”.
- Event Dates – e.g. “1–2 March 2026”.
- Tagline – Optional line under the title (e.g. “Live contacts from around the world”).
- Show Last Worked Banner – Scrolling “Last worked…” line.
- Show Contacts Today – Contact count (Cloudlog source).
- Show Distance – Distance to last QSO.
- Show Map Legend – On-screen legend for map symbols.
- Banner Scroll Speed – Marquee speed (1–10).
Widgets (banner, branding, legend) can be dragged like other panels; positions are saved. Configure your chosen data source in Integrations (Cloudlog or N1MM+), then click Save.